Setting up a Gatsby site blog on AWS using S3 and Cloudfront with a custom domain and HTTPS/SSL
Historically blogs required a significant infrastructure footprint to run. Platforms like Wordpress, and other Content Management Systems (CMSs) typically required a database server and a webserver. The blog posts/authors/etc. would be stored in the database, and the website would be rendered real-time on request by fetching the data from the DB. In theory this is great because it means visitors will see the latest edits to blog posts…but, in practice, this is overkill and content doesn’t change so frequently as to require constant database lookups on reads. Sure, it might be easy to use a WYSIWYG editor to fill out a blog post and hit the save button, but the overhead costs of running and managing servers is quite a heavy price to pay for such minor convenience. Not to mention the security risks posed by internet-accessible servers and the constant need to update versions of software to prevent being exploited.
Instead, the content is unlikely to change much after publication, and could be cached on a CDN to siginifcantly reduce the infrastrucutre footprint.
So, it’s not surprising that folks have been moving away from the heavy architecture requirements of CMSs and towards a lighter one where blog content consists of just the static assets deployed to a simple file service and cached into a CDN. No databases, no webservers, and far less hassle.
In this paradigm, git becomes the version control mechanism for editing your posts (instead of a database), and the file system becomes your set of records. Markdown files are blog posts. Advanced styling and front-end components are handled by Gatsby which converts React to static JS output. Then with a few simple terminal commands, updates and new content is built and deployed.
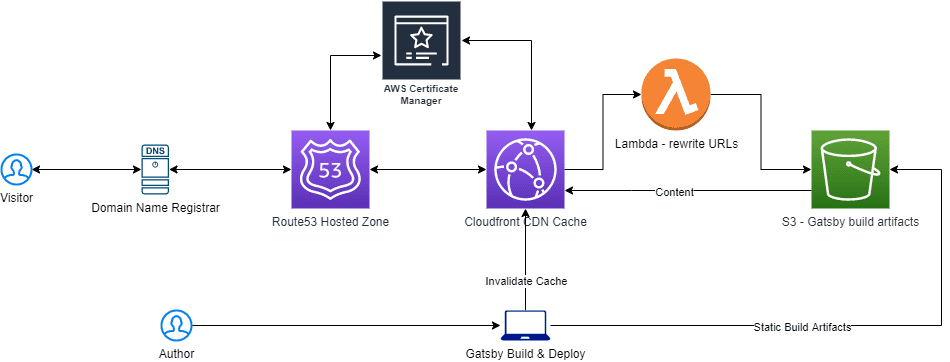
But first, it takes a bit of work to set up the infrastructure (on AWS in my case). The requisite components are:
- A registered domain name (on a registrar like Namecheap or GoDaddy or whatever you want)
- Route 53 to handle the domain name mapping
- ACM to handle the SSL certificate
- Cloudfront as the CDN
- S3 to handle storing the static content generated by the build
If you want to recreate my setup, here’s what I did. You’ll need to register a domain name on your own and this is very simple and the steps vary a lot based on each registrar.
In the AWS Console, open up Route 53 and create a hosted zone for your website (i.e. example.com)

AWS will create a few NS records and show them on the Hosted Zone list. You will need to replace the domain name servers used by default in your domain name registrar with these nameserver values. The steps to do this will vary a lot based on your registrar, but you’ll know you’ve done it when you can no longer create DNS records at the registrar and instead will do so in Route 53.
Once you’re finished with those changes, open up ACM in AWS Console, and request a new certificate for your domain (or wildcard) using the prompts/wizard. Once done, you will see that it’s in “Pending Validation” status. If you expand the details, you will see a CNAME record key/value pair that needs to be added to Route 53 (remember, you are using Route53 nameservers now instead of your domain name registrar):

Now you will have to wait for Amazon to finish the validation process before you can configure more (they say it takes at least 30 minutes, but this varies a lot in practice).
Once it’s finished, it will change the status to “Issued” and you should be able to select this certificate to complete the rest of the configuration (you can do some of this earlier, but then you’ll have to edit things once the certificate is issued and you might as well wait and do it once).
First create an S3 bucket to hold the website contents. Be sure to make this bucket publicly accessible.
Second, create the Cloudfront distribution for the bucket. Here is where you will select the SSL just created in ACM:

Also be sure to provide a default object (in the case of my Gatsby blog, it’s the index.html page). Historically web servers would load the index.html file when the root of a folder is requested, but this doesn’t happen with S3 and Cloudfront. Instead S3 returns a 403 when a folder is requested (instead of a 404) for security. This creates an interesting situation when you link directly to a blog post instead of the landing page—it will return an XML response that says access is forbidden. One hacky fix for this is to update the Cloudfront configuration so that it redirects to the Gatsby 404 page, which contains the Gatsby router and will be able to properly resolve the requested blog post, however there is a side-effect in that the browser will briefly show the 404 page before resolving the route. Here is an example of configuring this:

The typical use case for a CDN was to cache content like CSS files or JS files, images, etc. to minimize the workload of an actual webserver. So, it’s designed to respond to requests for direct resources, and it passes through requests to S3 in the same way when a resource is no cached. S3 was designed to just store and make available content like documents as well—not to serve index.html files from directory requests.
However, it’s possible to make the Cloudfront/S3 services act more like traditional web hosts so that it loads an index.html page when directory routes are requested. Unfortunately this isn’t something that can be configured straight away, and I found a solution using Lambda@Edge in this other blog post.
So, I defined a Lambda function as that blog post describes (it just appends an index.html to requests which end in a trailing forward slash, corresponding to a directory request):
exports.handler = (event, context, callback) => {
  const request = event.Records[0].cf.request;
  const uri = request.uri;

  if (uri.endsWith('/')) {
    request.uri += 'index.html';
  } else if (!uri.includes('.')) {
    request.uri += '/index.html';
  }

  callback(null, request);
};
And made sure to publish version 1 in us-east-1 (only region that supports Cloudfront triggers). Now it’s possible to configure the event trigger for the function:

NOTE: you might get an error trying to save this:
An error occurred when creating the trigger: The function execution role must be assumable with edgelambda.amazonaws.com as well as lambda.amazonaws.com principals. Update the IAM role and try again.If so, you’ll need to update the IAM role as described by AWS docs:

Now we need to point Route 53 at the Cloudfront distribution (which will be caching the S3 bucket contents). Create a new record in Route53 and select the Cloudfront distribution you created:

You can also do the same thing for the IPV6 alias, ending up with two records:

At this point if you upload an index.html file to your S3 bucket and navigate to your domain name, everything should resolve and show you that content. In the future I’ll be configuring some local build/deployment commands and plugins for AWS, and looking at Github actions to automate the process when commits are merged into the master branch. For now, the build/deploy is handled manually by the blog post author(s) through command line arguments:
npm run build && npm run deploy

Overall, my experience with using AWS infrastructure is much smoother than when I attempted the same architecture on Azure and ran into some CDN issues. The weird issues necessitating the Lambda@Edge workarounds are not surprising given the original use cases for the technology.